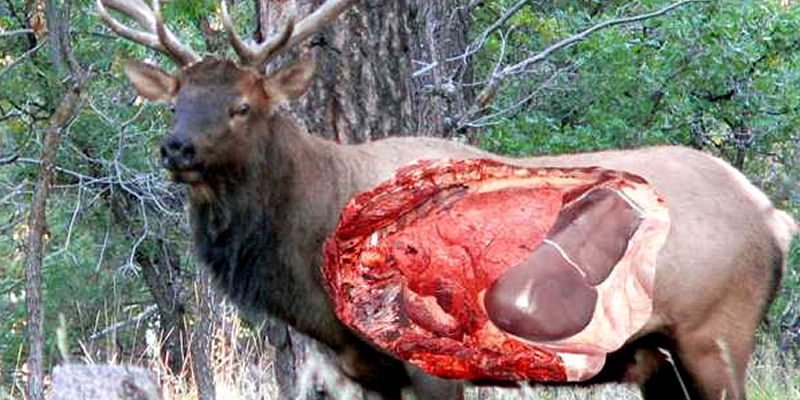
Perhaps we’ve all felt the heartache that often accompanies a missed shot. Or worse yet, the pit in our stomach at the realization that we possibly made a bad shot. Whatever the case, we owe it to the animals we hunt to do all we can to make a quick, clean kill. Hours, days, and months of practice and preparation can greatly increase our odds of being successful. This preparation, combined with some basic knowledge of elk anatomy, can boost the chances of feeling excitement, and not disappointment, the next time we pull the trigger!
There are 3 factors that contribute to making a quality shot on an animal in the field: (1) Practicing with your weapon, (2) Knowing the distance to your target, and (3) Knowing where to aim.
Spending time during the off-season practicing with your bow or rifle will increase your confidence in your weapon. When the moment of truth presents itself, it’s important to have confidence, knowing you’re going to hit where you aim. Hours and hours of practice will create the muscle memory and skills necessary to make the shot when it counts the most. To consistently produce results, you’re better off keeping your shooting skills honed year-round, not simply picking up your weapon a few days before the season opens.
Just as off-season practice will increase your confidence of being able to hit where you aim, knowing the distance to your target will also give you an additional advantage. Misjudging distance has been a main reason for more missed shots than most of us probably care to count. It’s frustrating to have everything finally come together, only to shoot high or low due to not knowing where to hold. Rangefinders have eliminated much of the guessing game in judging distance, but many times an opportunity presents itself so quickly that we don’t have time to get an accurate range. Being comfortable with the “manual” method of distance-judging is important. Attending 3D shoots in the spring and summer or shooting squirrels or other small game in the off-season can give you the confidence you need when determining the actual distance to your target.
 The last factor that contributes to making a quality shot is knowing where to aim. It does no good to be proficient with a bow or rifle and know the distance to the target, if you don’t know where to aim. As hunters, we owe it to the animal, and to fellow hunters, to do all we can to make a quick, humane kill. A razor sharp broadhead inflicts massive bleeding and causes quick death by major blood loss, only if placed where it can do its job. Elk are incredibly tough animals, and a broadhead in the neck or shoulder won’t typically provide the lethal results we desire. It is best to aim for the “vitals”, the area within the body cavity that houses the heart and lungs, as there are several major arteries in and around those organs that can produce sudden and severe blood loss. An arrow or bullet in this area will almost always give a hunter the best opportunity for a quick kill, as well as provide a good bloodtrail for a quick recovery.
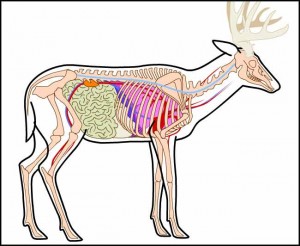 There are 5 shots to look at when considering getting an arrow or bullet into the vital area: (1) Straight-away (rear) shots, (2) Quartering-away shots, (3) Broadside shots, (4) Quartering-to shots, and (5) Frontal (straight-on) shots. The image to the left provides a good reference for each shot possibility.
Due to the large hip and leg bones on the rear quarter of an elk, a straight-away shot is not typically a high-percentage or advisable shot. If an arrow is lucky enough to make it through this area of large bones, it still has a long ways to go to get into the vitals (up to 48″ on elk) and will often stop short of the lungs in the stomach/gut area. For this reason, we would strongly advise against ever considering this shot.
The quartering away shot is a favorite of many elk hunters. It provides great exposure to the vitals with minimal resistance. About the only obstacle to consider is the smaller ribs that will be encountered at the back-end of the ribcage. Penetration into the vitals (usually 12-18″ needed for elk) typically isn’t an issue. The drawbacks to consider on a quartering-away shot are the possibility of only hitting one lung as well as hitting the off-side shoulder which would prevent a pass-through. Additionally, the entry hole is often behind the ribcage in the guts which can lead to a plugged entry hole. This, combined with no exit hole can lead to a tough bloodtrail, especially if only one lung is hit. If taking a quartering-away shot, try to visualize your entry/exit and aim so that you can get both lungs (minimize the angle) and/or get a good pass-through.
The time-tested and proven standby is the traditional broadside shot. Not much can be debated regarding a standing, broadside shot. This gives the largest target with a size-able margin of error, great exposure to the vitals, and a high possibility of a quick, clean kill. The image above is a great reference for where you want to aim on a broadside shot. A great aiming point is half-way up the body, right on the crease behind the shoulder. From the diagram you can see that this will place your shot above the heart, solidly in both lungs, at a point where several major arteries convene. If you shoot high, you still have lungs above. If you shoot low, you have lungs and the heart. If you shoot back, there are still a lot of lungs behind you. Be careful with shooting to far towards the shoulder as the leg bone and shoulder blade are tough bones to penetrate. It is important to note, however, the angle of the leg bone. Contrary to many thoughts, the leg bone does not run straight up the leg but actually angles forward, creating a nice pocket directly above the point of the elbow. The broadside shot is, without a doubt, the best shot you can take on an elk.
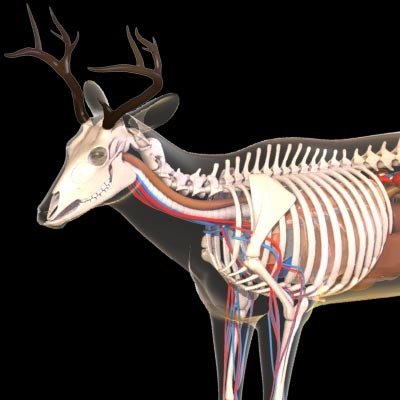 The last two shots are highly debated and can create controversy between even the best of hunting partners – the quartering-to and the frontal shots. I’m not going to recommend taking these shots, but I’m also not going to advise against these shots. I will, however, urge hunters to study the anatomy of an elk and determine for themselves whether the shot is effective or risky.
As you can see from the diagram to the right, a quartering-to shot is tough due to the position of the front leg bone, especially at the angle shown. At a slightly sharper angle, the leg bone is not directly in alignment with the vitals, but it leaves a smaller margin of error than a broadside shot. I would strongly advise against aiming behind the shoulder on a quartering-to shot as you will get one lung at best and the bloodtrail will typically be difficult.
The frontal shot is one that is hotly contested. Those who have made frontal shots can attest to the massive and immediate trauma that a well-placed frontal shot can inflict. The arguments against taking a frontal shot, however, are worth taking a look at as well. Penetration – many hunters will argue that it is difficult to get penetration in this area, referring to the “grapefruit-sized” opening you have to hit in order to miss the ribs. Additionally, the target is smaller, therefore, it is viewed as a low-percentage shot.
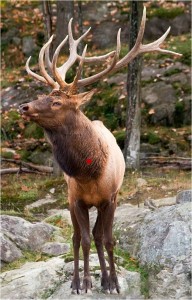 There are 2 issues that definitely need to be mentioned if you are considering a frontal shot: (1) Don’t aim low. Aiming low puts you in the “sternum” area and although the ribs are small in this area, at a fully frontal angle they are concentrated and it is best to hit above them. (2) Be sure to hit in the center and not to the side. Shooting off-center (especially combined with a low shot) on a frontal shot exposes an arrow to deflection off the ribs, resulting in the arrow penetrating between the rib cage and the shoulder blade. The image to the left shows where to aim on a straight-on (frontal) shot. Avoid aiming at the transition of dark to light hair – this is where the sternum comes together and you can also see the leg bones are closer together in this area. Aim halfway up the body cavity, just as you would on a broadside shot. In this area you have a 12″ window that will safely take you into the vitals. Additionally, the jugular as well as several other main arteries run through here, and the resulting blood loss from a shot in this area can be devastating.
When it comes to shot placement on elk, the bottom line is this – shoot where you are confident. This applies to every aspect of the shot: distance, angle, etc. Practice at the distances you plan to shoot. Know your limits and STICK TO THEM IN THE FIELD! Educate yourself on anatomy – know ahead of time where you need to aim, and where you are comfortable aiming to make a clean shot, and STICK TO IT! Frustration and desperation have to lead to success, but more often than not, they lead to failure. Be patient and wait for a shot you are confident you can make. There is only one feeling worse than tracking an elk after a bad shot, and that is not finding that elk. Educate yourself and practice, and your confidence will lead to success in the field!

I had never taken a frontal shot on a bull elk until last week. I am aware of the proper shot placement, and have taken two mule deer with this shot that died within sight – one traveled about 30 yards, the other about 6 feet. Last week I called a bull in to 18 yards, I had reason to believe he would scent me and spook before offering a broadside shot. My view was almost identical to the photo above with the red shot placement dot, except he was looking to my right. I held right on his trachea in the dark mane hair above the esophageal groove. It was a chip shot and the arrow penetrated completely, I watched the nock and fletchings disappear right where I aimed. There is absolutely no question in my mind I killed that bull. However, he never shed a drop of blood, and I assume the mane hair was sufficient to absorb the bleeding from the cut in his hide over the trachea.
After over 7 hours of searching in extremely thick cover by three people, including a 500′ tightly gridded GPS search, temperatures had reached upper 80s and no chance of salvaging the meat remained. I’m done elk hunting for the year, and will not take that shot again on an elk.
Frontal is best avoided if possible, especially on heavy critters. I had a big bull moose under 20 yards, frontal for what seemed like an hour, but was only about 4-5 minutes. I HAD him, I burned a hole into the hair I was going to slice if I wanted the shot, and it was a slam-dunk for me. But something told me this was a once in a lifetime animal, they wind was in my favor, just to wait him out. I did, and I’m glad, he turned full broadside and I placed the broadhead right behind his near leg as he made his first step to my left. You could hear arrow cutting swamp reeds on his far side for quite a ways. He only went 40 yards. Wait them out! https://uploads.disquscdn.com/images/b29d9f4c551fdd2ab1726a589fcd8bf0f3c20ba70223128ac8a615fb472c7466.jpg